To benchmark and manage your SEO and other site analytics, we recommend using Google Search Console. This tool offers the ability to submit your sitemap, check the status of your page indexing, request index updates, and see how your website performs in Google Search.
Creating your Search Console Account
Submitting your Sitemap
Performance Reports
Index Coverage Report
URL Inspector Tool
FAQ
Creating your Search Console Account
The steps for creating your Google Search Console account are a bit different depending on whether you are using your default PhotoShelter domain (such as atlantaphotography.photoshelter.com) or a custom domain (such as www.atlantaphotography.com). Follow the steps below that fit how your website address is configured:
If using your default PhotoShelter domain or a custom subdomain:
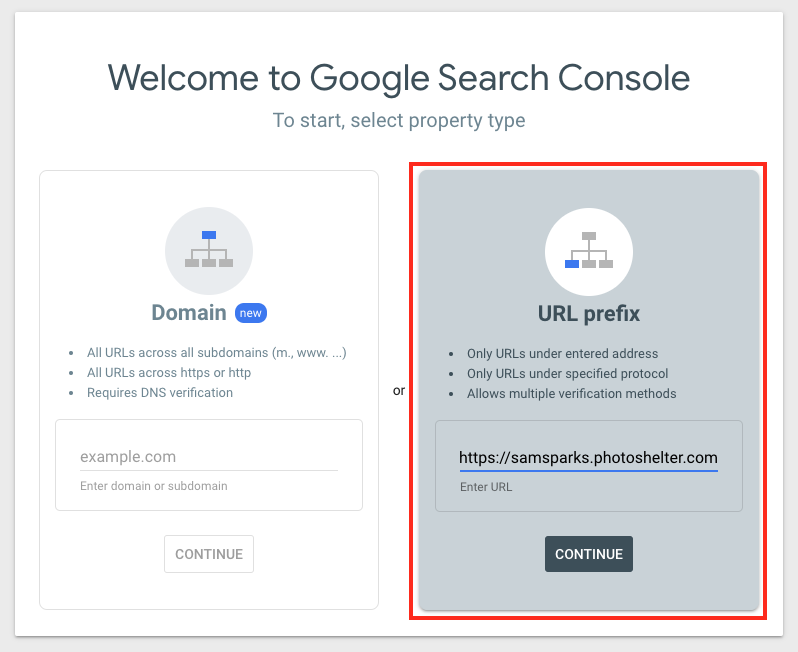
1. To get started, head to Google Search Console and log in to your account.
2. On the next screen, select URL prefix as your property type, and enter your full website address including https://.
3. In the verification window, select HTML tag:
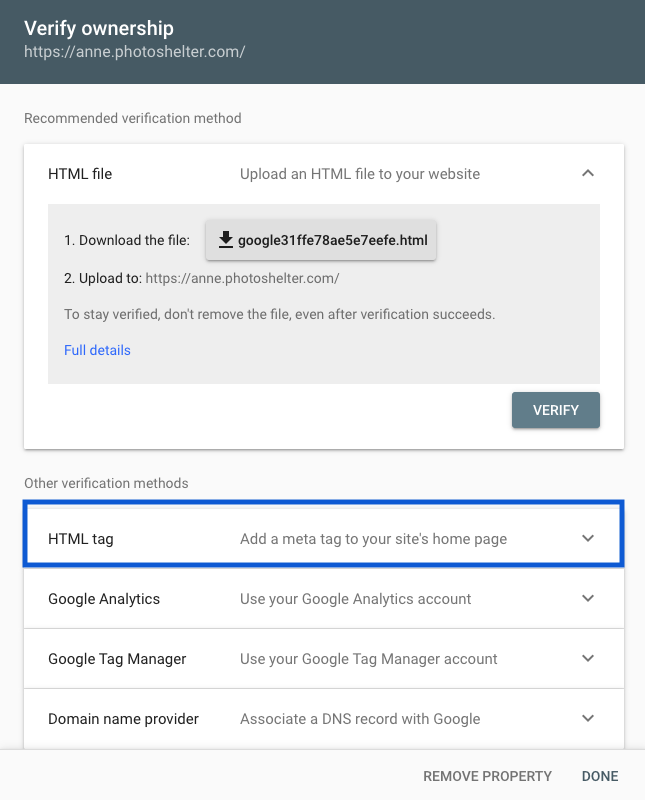
4. Copy the HTML verification tag provided.
5. In a new window, log into your PhotoShelter account and navigate to General Settings.
6. In the “HTML Head Code” field on your general settings page, paste the HTML verification tag. When you’re done, click Save Settings.
7. In Google Search Console, click the Verify (it may take a few minutes to propagate). Once you see an “ownership verified” message, click Go to Property.
If using a custom domain (CNAME):
1. To get started, head to Google Search Console and log in to your account.
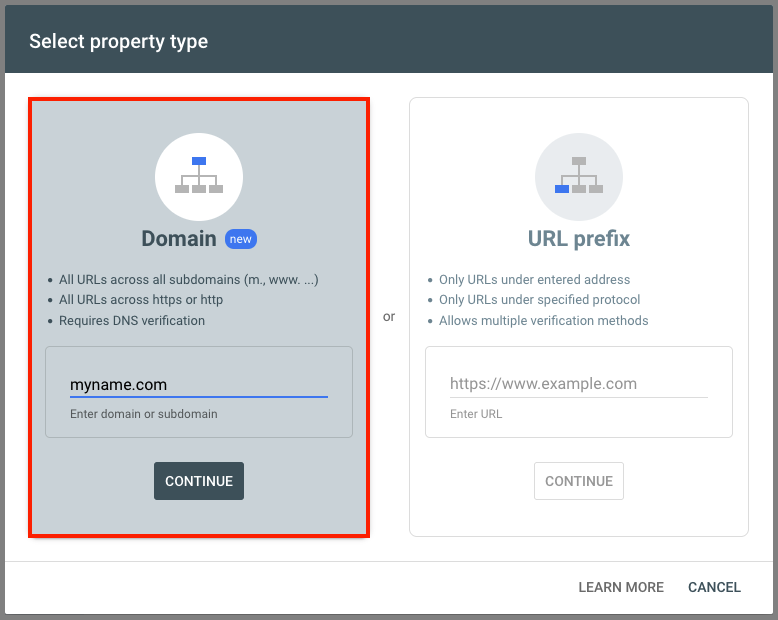
2. On the next screen, select Domain as your property type.
3. Enter your website address without https:// or www and click Continue.
4. In the verification window, select Domain Name Provider:
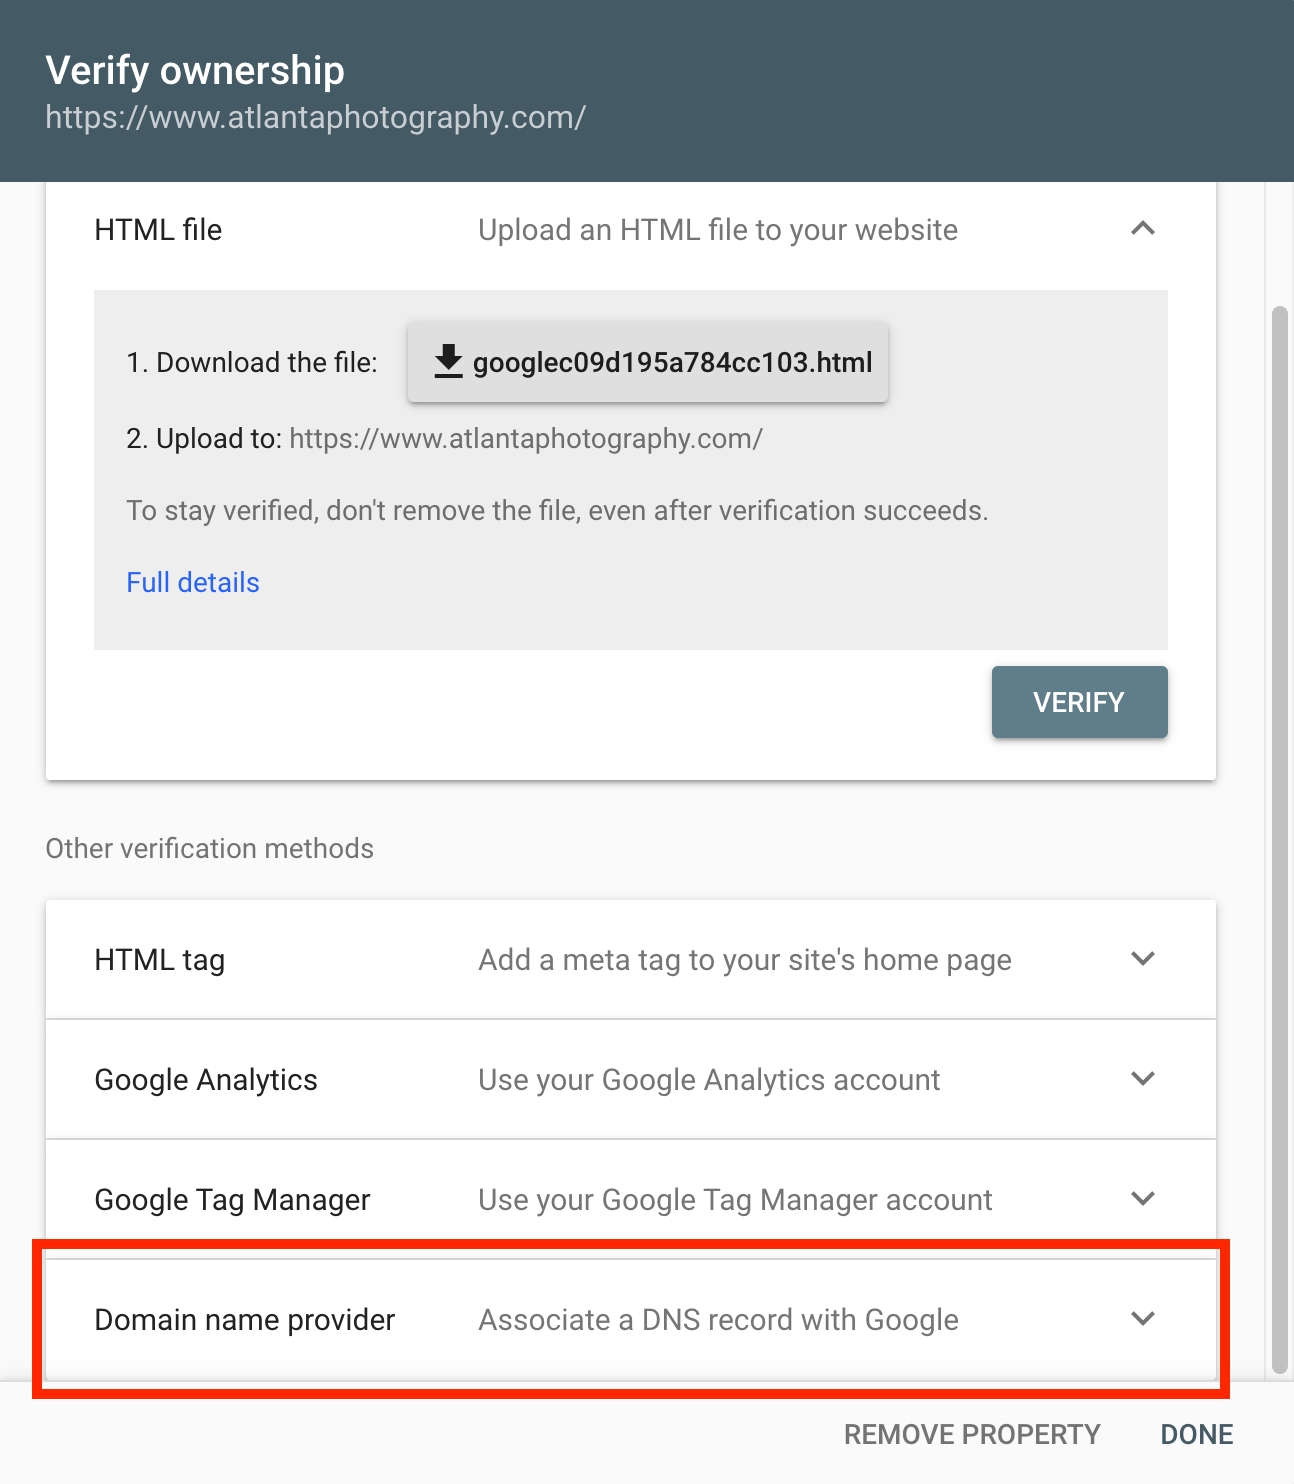
5. Copy the TXT record.
6. In your domain registrar account, find your DNS Editor or DNS Manager.
7. Create a TXT record with the following values in each field:
- Type: TXT
- Host: @
- Value/Name: [paste here the TXT record you copied in Step 5]
- TTL: [leave this field as is]

7. In Google Search Console, click Verify (your new TXT record may take between 24-48 hours to propagate). Once you see an “ownership verified” message, click Go To Property.
Submitting Your Sitemap
1. Locate your sitemap URL by appending /sitemap.xml to the end of your website address.

2. Your unique sitemap URL can be found between the <loc> tags as indicated below:

3. If you are submitting a sitemap for your custom PhotoShelter URL, copy everything after .com/ in the sitemap URL. Using the example above, you will copy:
user-sitemap/sitemap-U0000RGPPaLDIoyo/0.xml.gz
If the sitemap is for your custom domain name, copy the entire link. For example:
https://www.myname.com/user-sitemap/sitemap-U0000RGPPaLDIoyo/0.xml.gz
NOTE: If you have multiple sitemaps listed, submit each one individually.
4. In Search Console, click Sitemaps and paste the sitemap URL copied in step 3.
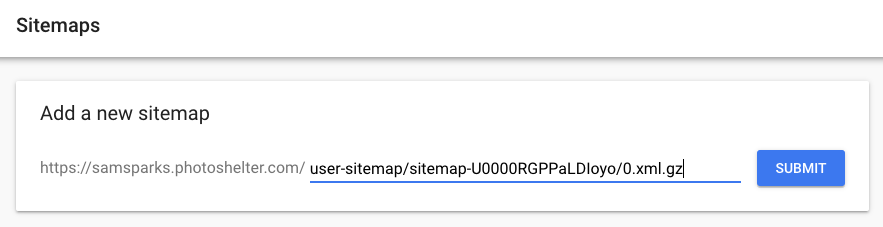
5. Click Submit to submit your sitemap will be submitted to Google.
Performance Reports
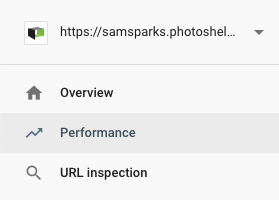
Click “Performance” in the left menu of your Search Console account to view metrics on how your site is performing in Google Search. Here you will be able to specify a timeframe to view real searches that pulled up your site in results, how many times someone saw your site in their search results (Impressions), how many times someone clicked on your site in search results, and more metrics on the location of and devices used by people searching.
Index Coverage Report
The Index Coverage Report gives you a full overview of what pages on your website are currently indexed, what pages have been discovered but not indexed, and why. Google suggests that if your website has less than 500 pages, you probably don’t need this report.
Instead, easily see what pages are currently indexed by Googling your website URL with site: in front of it (i.e. site:samsparks.photoshelter.com or site:www.samsparksphotography.com). If you don’t see a particular page here you thought would be listed, use the URL Inspector Tool to request indexing of that page.
Easily see what photos on your site are currently indexed by performing the same site: search on Google Images.
URL Inspector Tool
The URL Inspection tool provides information about Google's indexed version of a specific page, including whether it’s been discovered, whether it’s been indexed, and if any errors are preventing the page from being indexed.
To inspect a page on your site, type the entire URL of that page (including https://) in the search bar at the top and hit Enter:

Your inspection results will appear on the page. For complete instructions on how to interpret the results, take a look at Google’s help article.
Request (re)Indexing
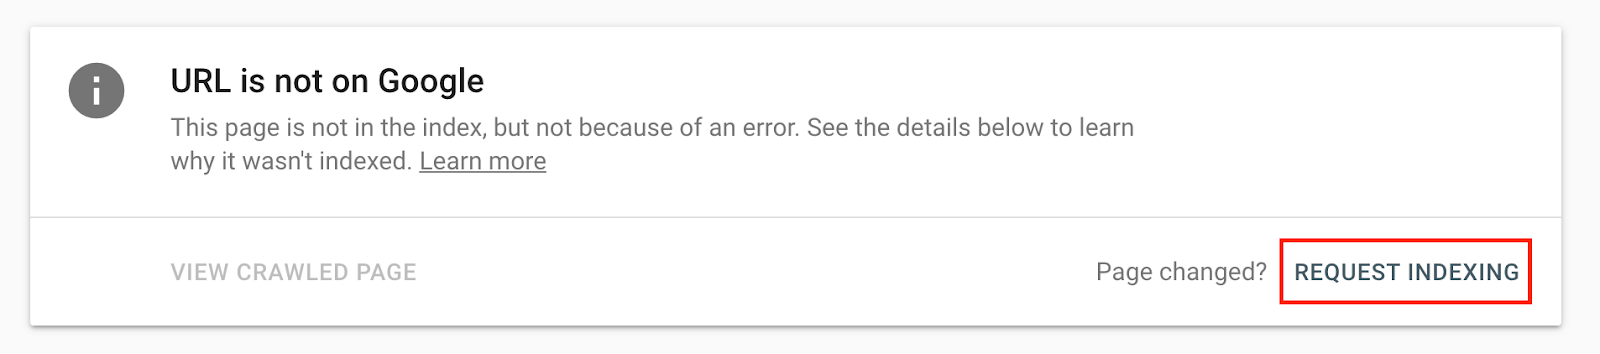
Once you’ve inspected a URL, you can request that it be indexed or re-indexed. If the Inspector Tool says the page is not on Google, you can click “Request Indexing” to make sure it’s queued up for indexing:
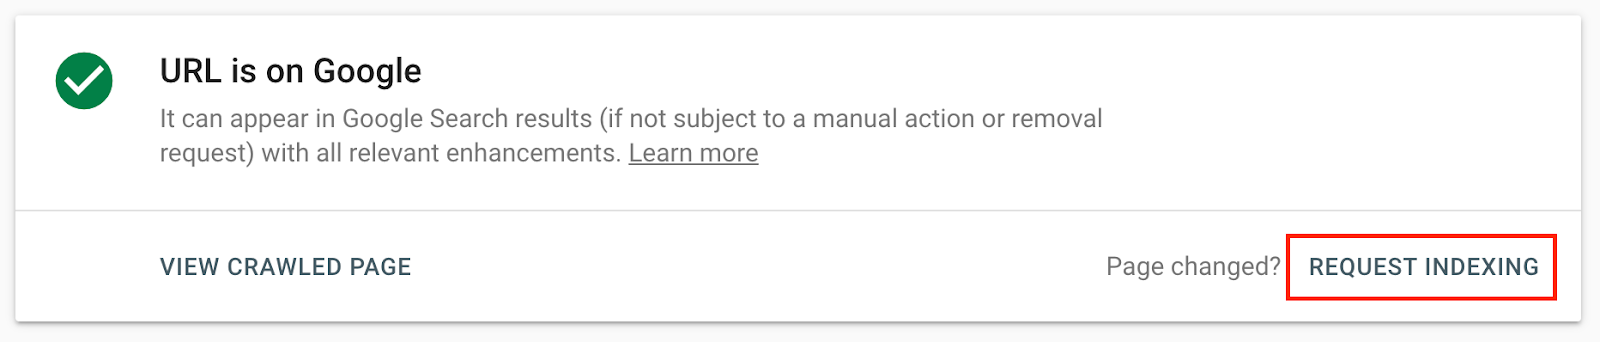
If the Inspector Tool says the page is on Google, but you’ve made recent changes to the page’s content or meta title/description, click “Request Indexing” to request that Google update their index per your changes:
Indexing can take up to four weeks; you can check the progress using this tool. If you receive an error after clicking “Request Indexing,” please refer to Google’s Understanding the Results section.
FAQ
What is a sitemap?
A sitemap lays out the architecture of your website, including its pages and images, in a format that’s easy for Google to digest. It will include links to various parts of your site, such as your homepage, about page, public galleries and collection, and your publicly searchable images.
Do I need to resubmit my sitemap each time I make changes to my website?
If you simply changed what’s on an existing page, you can use the URL Inspector Tool to request re-indexing with the new changes. If you add new pages or photos to your site, it’s a good idea to resubmit your sitemap! Our system will generate and update sitemaps once a week, so it’s best to wait a week after you add your new pages or photos to submit your sitemap again.
I submitted my sitemap, but I’m still not seeing my site in Google results.
Please note that there is a difference between submission, verification, crawling, and actual indexing of your website's content. In other words, we can guarantee that your sitemap will be generated and help you submit it to Google, but when Google actually reads it and adds your content to its index is another matter (over which we mere mortals have no control!). Use the URL Inspector Tool in Search Console to request that a specific page be indexed.
Try searching your website URL on Google with site: in front of it (i.e. site:samsparks.photoshelter.com or site:www.samsparks.com). The pages that appear in the results have been crawled and indexed by Google. If they aren’t showing on the first few pages of search results otherwise, you’ll want to focus on improving your website’s SEO. For more on SEO, be sure to check out all our tutorials under the SEO & Google Analytics section.
Questions? Concerns? Need help? We recommend visiting the Google Console help center for a deep dive on any sitemap issues you may run into.