One of PhotoShelter's most popular features is the built-in shopping cart, which allows photographers to simply and efficiently sell images online in a variety of ways. If you've come this far, you're probably already familiar with our e-commerce tools and are ready to start selling.
The first step is to get set up to sell, where you'll determine how you want to be paid, name your pricing (for prints, products, packages, personal use downloads, and/or royalty-free or rights-managed licenses), and determine which images you want to make available for sale. For more information, head over to our comprehensive Selling tutorials.
Once you're all set, the final step is to acquaint yourself with what your clients will see when visiting your website. In the sections below, we'll showcase the buyer's experience and what he or she will see when purchasing from you.
As visitors browse your site, they will be presented with the option to buy images in one of two ways, depending on your website settings:
-
A single image (from either the Gallery Image Display page or Search Results Image Display page).
-
A group of images at once (from the thumbnail-view Gallery Display page).
Adding a Single Image to the Cart
If a visitor is viewing a gallery on your site or is browsing the results of an image search, he or she can click on an image in order to open up the enlarged version. We refer to this page as either the Gallery Image Display page, or the Search Results Image Display page.
If the image has been priced, the potential buyer will see a button or link either above, beside, or below the image, depending on the PhotoShelter theme you're using to indicate that it is available for sale. This button may say "Add to cart" or "Buy" (again, depending on how you have chosen to customize your site).
![]() Note: You must have completed the 3 Steps to Selling and have the Add to Cart Link enabled on your Gallery Image Display and/or Search Results Image Display pages.
Note: You must have completed the 3 Steps to Selling and have the Add to Cart Link enabled on your Gallery Image Display and/or Search Results Image Display pages.

Once this button is clicked, the buyer will be presented with all of the purchasing options you've assigned to that particular image. Read more about purchasing options in Ways to Sell Your Images.

Adding a Group of Images to the Cart at Once
If a visitor is viewing a gallery on your website, the images contained within the gallery may display as a list of thumbnails or as a slideshow, depending on the settings you have chosen for this page -- the Gallery Display page).
With either format, if any number of the images in the gallery have been priced for sale, the potential buyer will see a button or link either above or beside the thumbnails, or below the slideshow, depending on the display options you have chosen for this page and the theme you are using, to indicate they are available for sale. This button may say "Add to cart" or "Buy" (again, depending on your chosen theme and customization options).
![]() Note: You must have completed the 3 Steps to Selling and have the Add to Cart Link enabled on your Gallery Display page.
Note: You must have completed the 3 Steps to Selling and have the Add to Cart Link enabled on your Gallery Display page.
The same button will appear on your Search Results page if the images presented in the results have been priced.
![]() Note: If your gallery or search results exceed 1000 images, this option is hidden from view. (It simply takes too long to load otherwise, and we don't want to bore your clients!)
Note: If your gallery or search results exceed 1000 images, this option is hidden from view. (It simply takes too long to load otherwise, and we don't want to bore your clients!)

In either event, when the Buy or Add to cart button is clicked, the buyer will be taken to a separate page that displays thumbnail versions of all the images in the gallery or search results. The buyer may choose to select all of the images for purchase, or just a desired few. A grayed-out image indicates that a particular image is not available for sale.

Next Steps for Both Single and Group Image Purchases
Once images have been selected, the buyer may choose to continue and will then be presented with all of the purchasing options you've selected for these images. If all of the images within the gallery have not been priced in the exact same way, we will add some text to the particular line item to indicate this.
You'll note in this example that there are multiple tabs in the Add to Cart window - one for each type of purchase: prints, products, or downloads. The buyer may browse between the available items by clicking through the tabs, and everything he or she chooses will be added to the cart in one click with the Add to Cart button.
![]() Note: The Prints tab is the first to appear for the buyer by default. You may change this so that Products, Packages, or Downloads displays first from the Website Settings area of your account (under Preferred Pricing Type).
Note: The Prints tab is the first to appear for the buyer by default. You may change this so that Products, Packages, or Downloads displays first from the Website Settings area of your account (under Preferred Pricing Type).

When adding multiple images to the cart, your buyer must choose the same item for each image in the batch. For example, if your buyer adds eight images to the cart and chooses a 5x7 print size, he or she will have added one 5x7 print for each of the eight images in the selection.
If the buyer would rather have had one of those images in another size, say a 4x6, he or she could make that change from the shopping cart by replacing the 5x7 product with the 4x6.
If the buyer wishes to purchase prints, products, or downloads, the selection process is very straightforward. The buyer chooses a print size, product, or download option, and can proceed to checkout. However, if the buyer opts for a package (a set of items grouped together and sold for one price), he or she will have a second step of selecting the images that correspond with the various purchasing options that you have preset, as well as choosing the finishes for any prints in the package.
For example, if you have two 4x6 prints and two downloads in a package, your buyer will need to choose which images he or she wants as downloads, and which of them as prints, etc. Read more about Creating Image Packages.

After the desired prints/products/packages/downloads have been selected and the buyer has clicked the Add to Cart button, the buyer may choose to proceed to checkout or continue shopping.

If the buyer chooses to continue shopping, he or she may then check out later by accessing the cart via the Archive dropdown link in the top navigation bar on your website (you are able to rename this link if you wish, or link directly to the shopping cart by adding a link. For help with setting up your navigation, please refer to the Editing Your Sites Navigation Page).
The buyer can proceed directly to the checkout screens by clicking the Cart Button in the Archive Menu Dropdown that will appear in your website navigation bar.

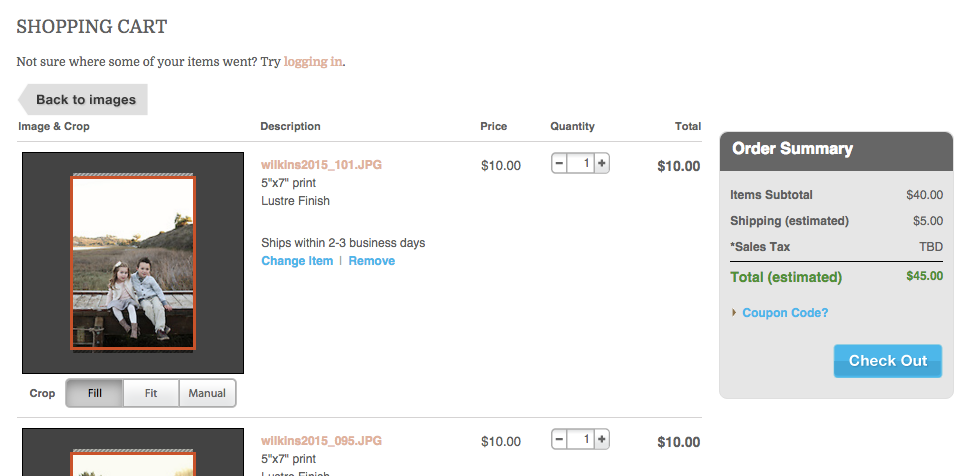
Once in the cart, the buyer may choose to perform any of the following actions:
- Increase or decrease image quantities.
- Manually crop images to ensure a desired finished product (for print/product purchases only and only if you choose to allow it).
- Change a print size or product for any image (i.e. change a 5x7 to a 4x6).
- Remove individual images from the cart.
- Empty the cart completely.
An order summary will also remain on the upper right side of the cart to display an estimated total for the buyer.

Once the buyer is ready to proceed, he or she will click the Checkout button. The buyer may then choose to either log in or proceed as a guest (no login required).
If a print/product/package is being purchased, or if you have required this for downloads for tax purposes, we will ask the buyer to enter a shipping address, choose a shipping method, and provide an email address (if not logged in).
If a download or license is being purchased, we will simply ask the buyer to provide an email address (if not logged in).

Completing the Purchase
All the buyer needs to do at this point, regardless of what is being purchased, is provide billing information to complete the purchase. The process depends on your chosen payment processor:
- PayPal: If you are using PayPal to transact with your buyers, your buyer will click a Continue to PayPal button to confirm the purchase and remit payment on PayPal's website. Please note that if you are using PayPal to accept payments, your buyer does not have to have a PayPal account in order to pay you. The buyer can use a regular credit card to pay your PayPal account, as long as you have this setting enabled. Learn more about configuring PayPal.
- Stripe: If you are using Stripe, your buyers will remain on your site when they click the Checkout button. The buyer will enter his or her billing and credit card information via your site, and the payment will be processed by Stripe. Learn more about configuring Stripe.
- Merchant account: If you are using a merchant account, the buyer will simply enter his or her credit card information during the checkout process. We are a verified secure website, and we never store your clients' credit card information. Learn more about configuring a Merchant Account.
Once the payment has been remitted, both you and your buyer are all set! Your buyer will see an on-screen invoice that summarizes the purchase, and you'll both receive email confirmations that contain the details. A few supplementary communications may also apply:
- If a download has been ordered, it will take a few minutes for us to prepare the file, and when it's ready we'll send the buyer another email that includes the download link.
- If the order contains any printed products, your buyer will receive another email when the final products have shipped. This either happens automatically when one of our automated print partners or Print Vendor Network members ships out the finished order or when you mark a self-fulfilled order as shipped.
You can check out all your sales information by selecting Sell > My Sales from the Navigation Bar. We also recommend signing out of your PhotoShelter account and going through the buyer process yourself to get a better sense of how it works with your chosen customization options.
A Note on Image Cropping
If the buyer is purchasing a print, buttons will appear below the image thumbnail in the shopping cart (if you have enabled this option in your pricing profile) allowing the buyer to select the desired crop.
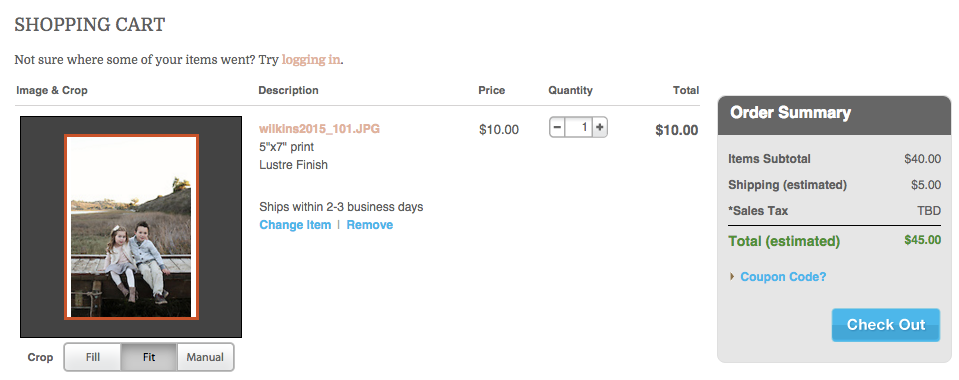
If the buyer does not want white borders, he or she can choose the preferred crop for that print size, either a "Fill" crop (which will center the image within the print and crop out the excess) or "Manual" (which will allow the buyer to use a movable mask to determine exactly how the image should be cropped).


If the buyer proceeds to checkout and we detect a cropping issue may be at play, the following message will appear, urging the buyer to make sure the crops are set exactly as he or she sees fit.
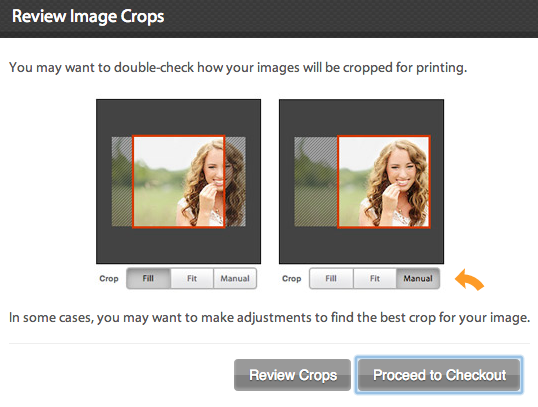
We will “flag” any possibly affected images to make the process as quick and easy as possible for your buyer.
