PhotoShelter fully supports FTP!
FTP is the preferred method of many clients, particularly editorial publications and wire services. This method of file transfer allows you to copy images from one site (local or Internet) to another using either an FTP client (a standalone desktop application such as Transmit or Fetch) or directly between websites.
PhotoShelter allows you to FTP to multiple concurrent destinations -- without your computer even being on.
We support the following types of FTP:
- FTP
- FTPS (FTP w/support for TLS/SSL)
- sFTP (secure FTP)
- scp (secure copy)
You may choose the method when you're setting up a destination (and may always edit later from the FTP Address Book).
PhotoShelter supports both incoming and outgoing FTP. This page describes the process for exporting images using FTP. For more on uploading images to your account via FTP, check out our detailed FTP (Incoming) tutorial.
Exporting Images via FTP
1. From the Left Pane in your Library or Image Browser, navigate to the gallery from which you'd like to FTP images. Then, from the Center Pane, select the individual images you'd like to FTP (or click the "select all" icon).
2. With images selected in your Library (If using the Image Browser, locate the Actions drop-menu, and select FTP), click the "FTP" button.
Please note:
If you have not yet created an FTP Destination, you will see the following dialog at this step,
which prompts you to add a destination before proceeding:
Lumen Library UI |
Image Browser (Classic) |
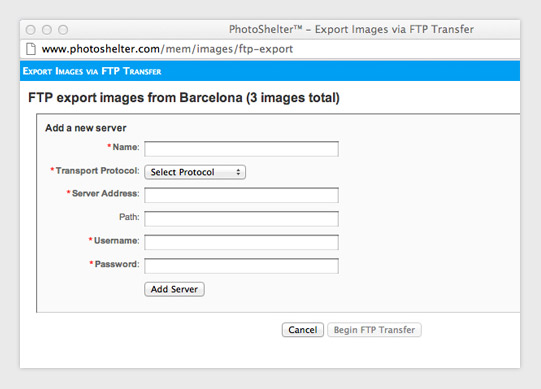 |
3. Once you've entered the information of your destination, click Add Server. (You may change this information later from your FTP Address Book.) You will then see the export dialog in full. Here you will specify the details of your transfer.
4. The first box, FTP Destinations, contains a list of all available destination servers for your account. You may always add more here by clicking the Create new destination button.
5. Select one or all of the servers to which you'd like to send the images by checking the box next to its name. You may use the Select All / Deselect All shortcuts to select (or deselect) all of your destinations at once.
6. If you'd like to convert your originals to JPEGs or send smaller JPEGs out, select JPEG file from the drop-down menu, at which point you'll see a second drop-down menu with size options. You have the option to downsize your files at the point of export.
7. If you have updated any image metadata within PhotoShelter since the images were uploaded, make sure the Embed updated metadata box is checked. Un-checking this box will send the files to the destination server with the same metadata the images had prior to being uploaded.
8. If you are sending images to a number of destinations and would like to create a new path for all of these destinations, check the Set folder name for ALL destinations box and insert the name of the path for your images.
9. To receive an email with status updates of your transfer, make sure the Alert via email when transfer completes box is checked. Your email address will be in the text field by default, but you may change this or add more recipient addresses (separated with commas).
10. Click the Begin FTP Transfer button to get started, and your images will be on their way! You may close this window, log out of your PhotoShelter account, and even turn off your computer, and the image transfer will not be affected.
![]() Note: You may cancel a FTP transfer that's in progress via the option progress meter on the pop-up window or from the FTP Transfers page.
Note: You may cancel a FTP transfer that's in progress via the option progress meter on the pop-up window or from the FTP Transfers page.
Once a transfer has been initiated, the pop-up window will advance to the FTP Transfer Status page seen here.
The status page auto-refreshes every 15 seconds with an updated status. For a full list of transfer details, you may review the FTP Transfers status page under Website > Stats & Analytics.
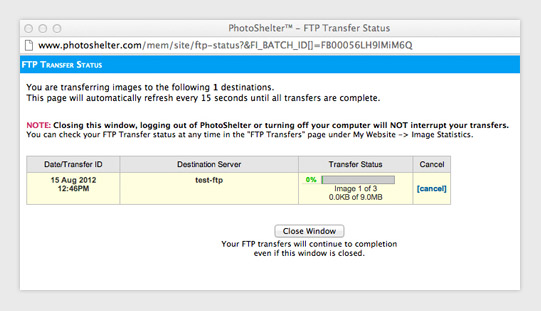
The transfer log gives you the status of your current transfer.
FTP Field Definitions:
| Name | Enter a label that will allow you to easily identify this destination. ("NCAA — Editorial" or "Yourname.com"). |
| Transport Protocol | Choose the type of FTP you'd like for this transfer: Standard, sFTP (secure FTP), or SCP (secure copy). |
| Server Address | Provided by the person or group to whom you're FTPing, this is the Web equivalent of a mailing address. A typical address appears in the "ftp.photoshelter.com" format. |
| Path | This optional field allows you to specify a particular folder on the destination server for your images. (Many clients suggest you specify a path with your name or other identifying information for proper processing on their end.) New paths can be created on the fly if the destination server allows it. |
| Username & Password | The login information (also provided to you by the recipient) allows you to access the destination server. |
FTP Address Book:
Whenever you create a new FTP Destination when exporting images via FTP, it is automatically added to your FTP Address Book for future reference.
Should you ever need to make changes to your FTP destinations (e.g. username/password change, an updated server address, etc.), they'll need to be made from your FTP Address Book, which is accessible under Website > Stats & Analytics > FTP Transfers. (The one exception here is the path, which can be updated on the fly when exporting images.)
You may also add new destinations from the FTP Address Book; anything added here will appear in your list of available destinations when sending images out via FTP.
FTP Transfers
To view all of your FTP transfers — both completed and in progress — in one place, head to the FTP Transfers page (located under Website > Stats & Analytics).
You may filter by time (last 24 hours, last 3 days, last 10 days, and last 30 days). We display 50 transfers per page.
To view all of your image transfers (both FTP exports and downloads your clients have made), please view your Download Logs page.
![]() Note: PhotoShelter automatically retries any failed transfers up to five times at 10-minute intervals. Having a time interval between retries provides better protection if the destination site is down or loses its Internet connection. If all attempts fail, your FTP Transfers page will reflect this fact, and if you set up an email notification, you will be notified via email of this event as well.
Note: PhotoShelter automatically retries any failed transfers up to five times at 10-minute intervals. Having a time interval between retries provides better protection if the destination site is down or loses its Internet connection. If all attempts fail, your FTP Transfers page will reflect this fact, and if you set up an email notification, you will be notified via email of this event as well.