Lightboxes are groupings of images -- created by you or your photographer -- that are best used for narrowing down selections or collaborating using star ratings and comments. If allowed by the photographer, you may also download or purchase images directly from a lightbox. Lightboxes are inherently private: They must be explicitly shared with others, including the photographer(s), and all invitees must log in before being able to view a lightbox's contents.
- Creating a Lightbox
- Saving Your Lightbox
- Organizing Your Lightbox
- Sharing with the Photographer
- Sharing with Others
- When a Lightbox is Shared With You
- Downloading and Purchasing
Creating and Adding to a Lightbox
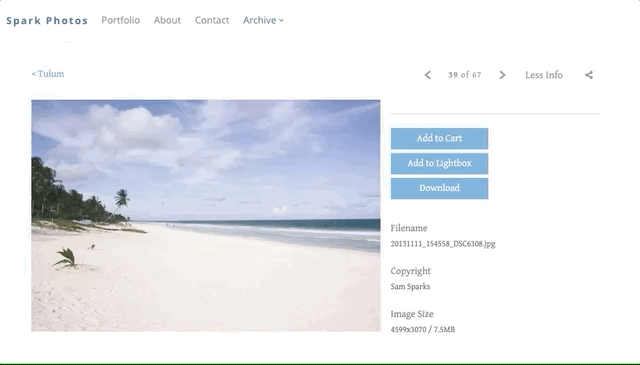
1. When creating a lightbox, you can add photos from any PhotoShelter photographer’s website that has this feature turned on. You’ll know the photographer has made this available if you see an “Add to Lightbox” button after clicking on a photo. Simply click this button to get started!
2. If you are already logged into a PhotoShelter account, once you click “Add to Lightbox,” you will be prompted to either select one of your existing lightboxes (if any), a lightbox previously shared with you (if any), or create a new one. Make your selection, or name your new lightbox, and click “Add to Lightbox.”
3. Next, you will be presented with a link to “Go to Lightbox.” You can also click “OK” if you prefer to continue browsing instead.
4. While continuing to browse, simply click the “Add to Lightbox” button next to any photo and select the appropriate lightbox to add it. You can even add photos from multiple PhotoShelter photographer’s websites to one lightbox!
Saving Your Lightbox
If you create and start adding to a lightbox as a guest (not logged in), your lightbox is temporary, meaning you can’t save it or share it yet. If you’d like to be able to visit your lightbox later, or share it with the photographer or a friend, you’ll need to log in or create a free account. Here’s how:
1. Go to your lightbox either by going to the "Client Area" page on the photographer’s website (if available), or by clicking the “Go to Lightbox” link that appears when you add a new image to your lightbox.
2. You’ll know your lightbox is temporary if it indicates this in the heading:
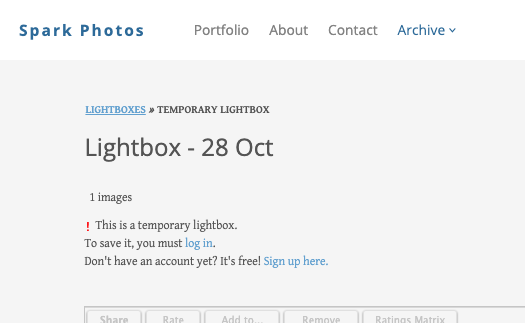
3. Follow the blue links to either “log in” or “Sign up here.”
4. Once you log in, your lightbox is automatically saved.
Organizing Your Lightbox
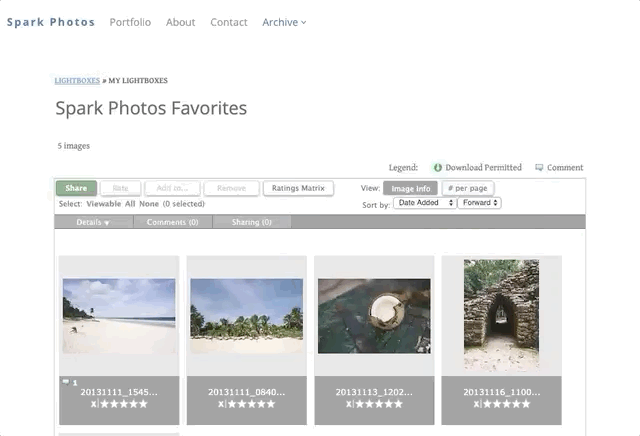
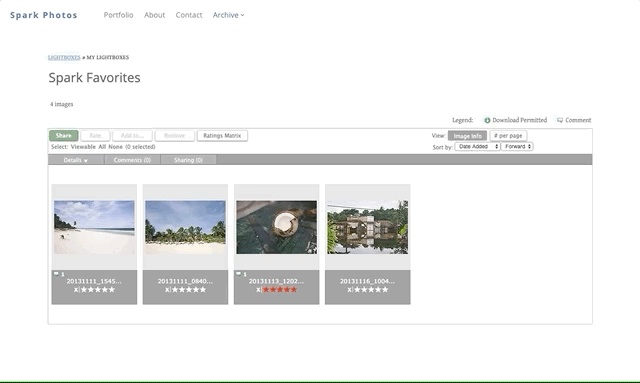
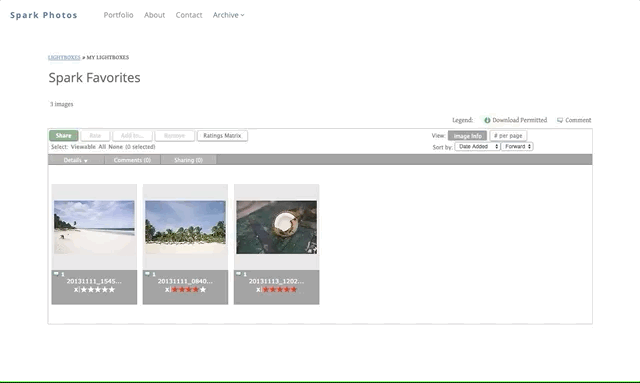
To review your lightboxes at any time, either find the "Lightbox" page in the photographer’s website menu, or log in to PhotoShelter.com and click “Hi, Your Name!” > "My Lightboxes." Here you'll see a list of both lightboxes you've created and lightboxes shared with you. Click the name of a lightbox to open it.
If you’re the creator of a lightbox, here are some things only you can do:
- Edit the name - Click the lightbox name at the top left of the page to edit it.
- Edit the details - Click “Details.” Here you will have the option to enter a client name, the project to which this lightbox relates, and a general description.
Below are some more things you can do as the lightbox creator. These are also things you can do in a lightbox that has been shared with you, given that the person who shared it has granted you these permissions:
- Remove photos - Select any image, or images, by clicking the filename, then click the “Remove” button to remove from the lightbox. If you’re viewing a single image, you can click the small trash can icon above the photo to do the same thing. This will remove any associated ratings and comments as well.
- Rate photos - Click one of the stars underneath a photo to assign a personal rating. You can see how everyone else has rated photos in the lightbox by clicking “Ratings Matrix.”
- Comment - Click on any photo in the Lightbox. On the single photo page, click the “Add a comment” link below the photo, enter your comment in the box that appears, and click “Add comment.” Click "comment" on the lightbox thumbnail page to leave a general comment on the lightbox.
- Email to a friend - Click on a photo to open the single photo page, and click “Email to a friend.” Enter a message and recipient email address, and click “Send.” This will not share the lightbox, but will send a link to that photo on the photographer’s website. The recipient of the email will only be able to see the image if they also have permission to view it.
Sharing with the Photographer
If you’ve added a photographer’s photos to a lightbox, the photographer can’t see what you’ve added until you share the lightbox with them. Here’s how:
1. Click the "Share" button. This will trigger the "Share Lightbox" pop-up box.
2. Here you have the option to "Select a Photographer/Image Owner" or enter an email address. Click the dropdown box under “Select a Photographer…” and select the person with whom you want to share the lightbox. If there are images from multiple photographers/owners in the lightbox, you will see multiple options here.
3. Enter a message to include with the invitation.
4. Check the appropriate boxes at the bottom to give the photographer or image owner permission to invite others, remove, rate, sort, and comments on images, or to send yourself a copy of the invitation.
5. Click “Share Lightbox.”
Sharing with Others
1. Click the "Share" button. This will trigger the "Share Lightbox" pop-up box.
2. Here you have the option to "Select a Photographer/Image Owner" or enter an email address. Enter the email address(es) of those with whom you’d like to share your lightbox.
3. Enter a message to include with the invitation.
4. Check the appropriate boxes at the bottom to give the invitee(s) permission to invite others, remove, rate, sort, and comments on images, or to send yourself a copy of the invitation.
5. Click “Share Lightbox.”

To see all the sharing permissions that you've set for this lightbox, select “Sharing.” Here you'll see a list of the people with whom you've shared this lightbox as well as the option to invite another person.
If you'd like to change permissions for any individual, simply click on that person's name. This will launch the "Update Lightbox Share" pop-up box, where you'll be able to manage this person's access.
When a Lightbox is Shared With You
You may receive an invitation to a lightbox via email from a photographer, a friend, or a colleague. Here are some things to keep in mind:
- To view the lightbox, you'll need to log into a free PhotoShelter account. If you don't already have an account, choose the option to create a new account after clicking the lightbox link.
- The person who shared the lightbox with you also set your sharing, rating, commenting, and photo-removing permissions. You may or may not be able to do all of these things.
- Now that it’s been shared with you, you can add photos to the lightbox! See the section above on how to do that.
- The person or photographer who shared the lightbox with you will not be notified when you view, rate, or comment on photos. Be sure to send them a message if you want to be sure they see your ratings and comments!
Downloading and Purchasing
If a photo is for sale on a photographer’s website, you can purchase it straight from your lightbox! Simply click on a photo to open it, then click the “Add to Cart” button.
If you have email-based permission to download a photo, you can do so from your lightbox. Click on an image to open it, then click the “Download” button.
Because lightboxes have the capability of housing photos from multiple galleries or photographer’s websites, you won’t be able to download an entire lightbox at once. If you’re interested in downloading a large batch of photos from a single photographer, please contact them with your request.