The client proofing tool provides a simple way for you and your clients to select the best images from a shoot. Clients effortlessly choose their favorites and send them to you for further processing, and you see exactly what they want without the need for back and forth emails, handholding, or any instruction whatsoever. It allows you to more easily control the proofing process, and dramatically simplifies the entire image selection workflow for both you and your clients.
The client proofing tool can be accessed for any given gallery from the Right Pane of your Image Browser. Available for Standard and Pro subscribers only.
Sharing Your Gallery
1. From the Left Pane, select the gallery you'd like to share.
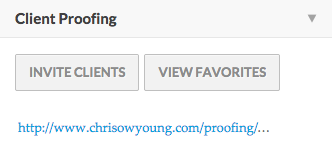
2. Locate the client proofing section in the Right Pane. Click to expand that section.
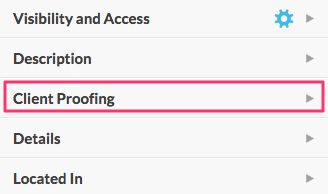
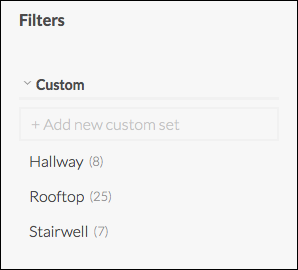
3. Determine if the images in the gallery need to be categorized in groups. If they do not, skip to step 7. If your images do need to be categorized in groups, you can create a custom set. Custom sets allow the viewer to see just the images in a particular set in addition to all of the images within a gallery. Click View Favorites to access.

A video overview of custom sets
4. This will bring you to the proofing area. Click + Add new custom set below Custom on the left side of the screen, type in a name for your new set, and click Add.

5. Next, click on the custom set you just created and click the pencil icon.

You will see all of the gallery images, and on hover you will see a check mark appear. You can check all of the images you’d like to add to the custom set either individually or in a batch (hold down the ALT key, click the first image you want to add, then click the last image you want to add). You can also click on a thumbnail image to view full screen and make your selections there (left and right arrows are also keyboard shortcuts). To edit a custom set, click the pencil icon after clicking the set name, and you can rename the set, or uncheck any image you’ve chosen by hovering over the check mark, and clicking the x that appears.

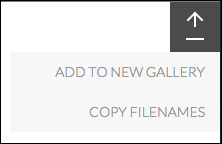
6. Once your custom sets are ready, you have 3 options: Add the images to a new gallery, copy the files, or share with your client. If you’d like to add to a new gallery or copy filenames, click the arrow on the top right corner of the screen.
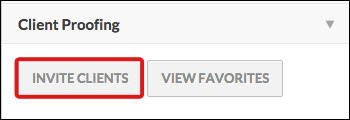
7. To share with your client, go back to your Admin Area and locate the Client Proofing section in the Right Pane. Click the Invite Clients button.
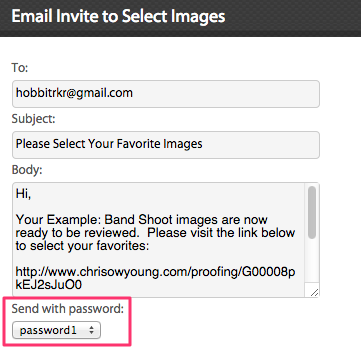
8. In the pop-up window that appears, enter your client's email address.
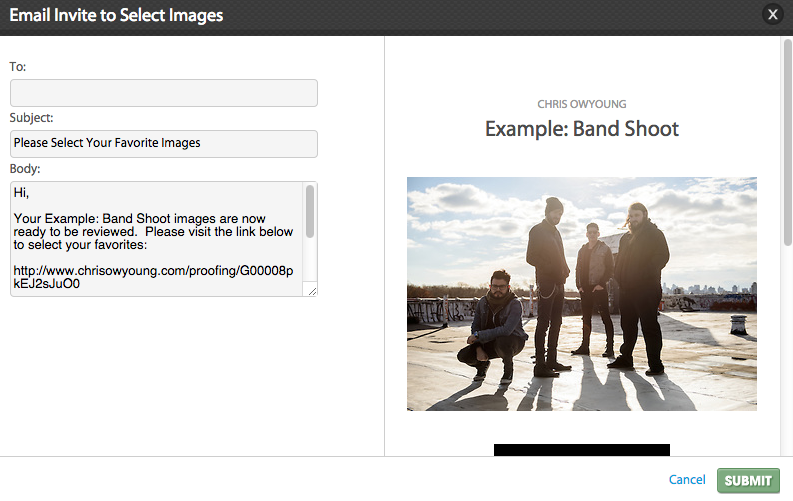
Both the subject and body of the email are editable, so you may change that copy if you like. On the right side of this pop-up, you’ll get a feel for what the email will look like when it lands in your client’s inbox. The image you see here will be your gallery’s cover image, which you may set or change at any time.
Note that the gallery URL displayed in the email body contains the word "proofing" to keep the proofing experience separate from the regular gallery display on your website. More on this in the Client's Experience section below.
9. IMPORTANT: The client proofing tool will always inherit the visibility permissions you have assigned for your gallery. So, depending on the specific use-case, you will want to check your Visibility & Access settings to be sure they align with your needs.
If your gallery is totally public -
- that is, set to a visibility of Everyone - when your client receives the client proofing email, they’ll click the view photos button and immediately be placed inside the gallery.
If your gallery has a visibility of Those with permission -
- and you’ve either set passwords or have granted specific users access, then the client proofing tool will also require either a password or login credentials to view.
In the case of a Those with permission gallery that has one or more passwords assigned, you will be asked which password you would like to require your client to use to view the gallery for proofing purposes.
Note: Unless your gallery's visibility is tied to a specific client's email address, anyone with the proofing URL (and password, if applicable) will be able to view the gallery in this capacity.
More information on gallery visibility may be found in our detailed Who Can View Your Images? tutorial.
6. When you’ve looked everything over and you’re ready to share, click the submit button.
The Client's Experience
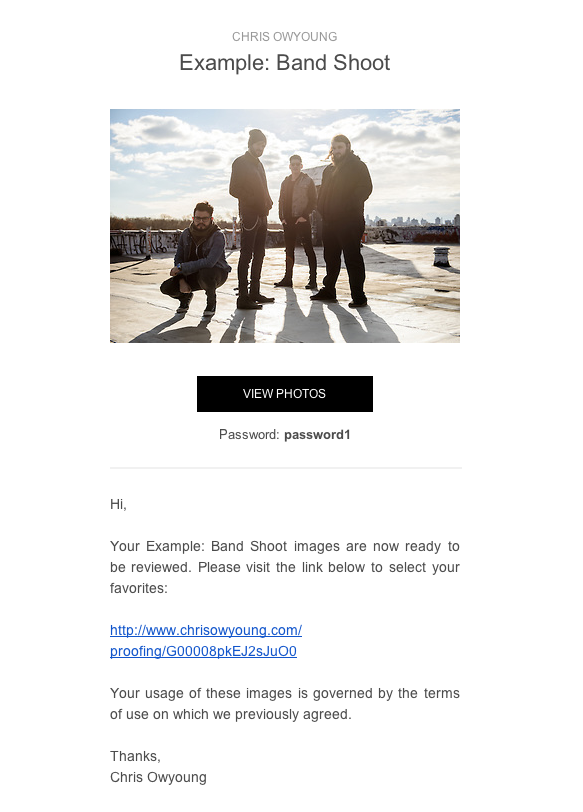
Here's the email your client will receive:
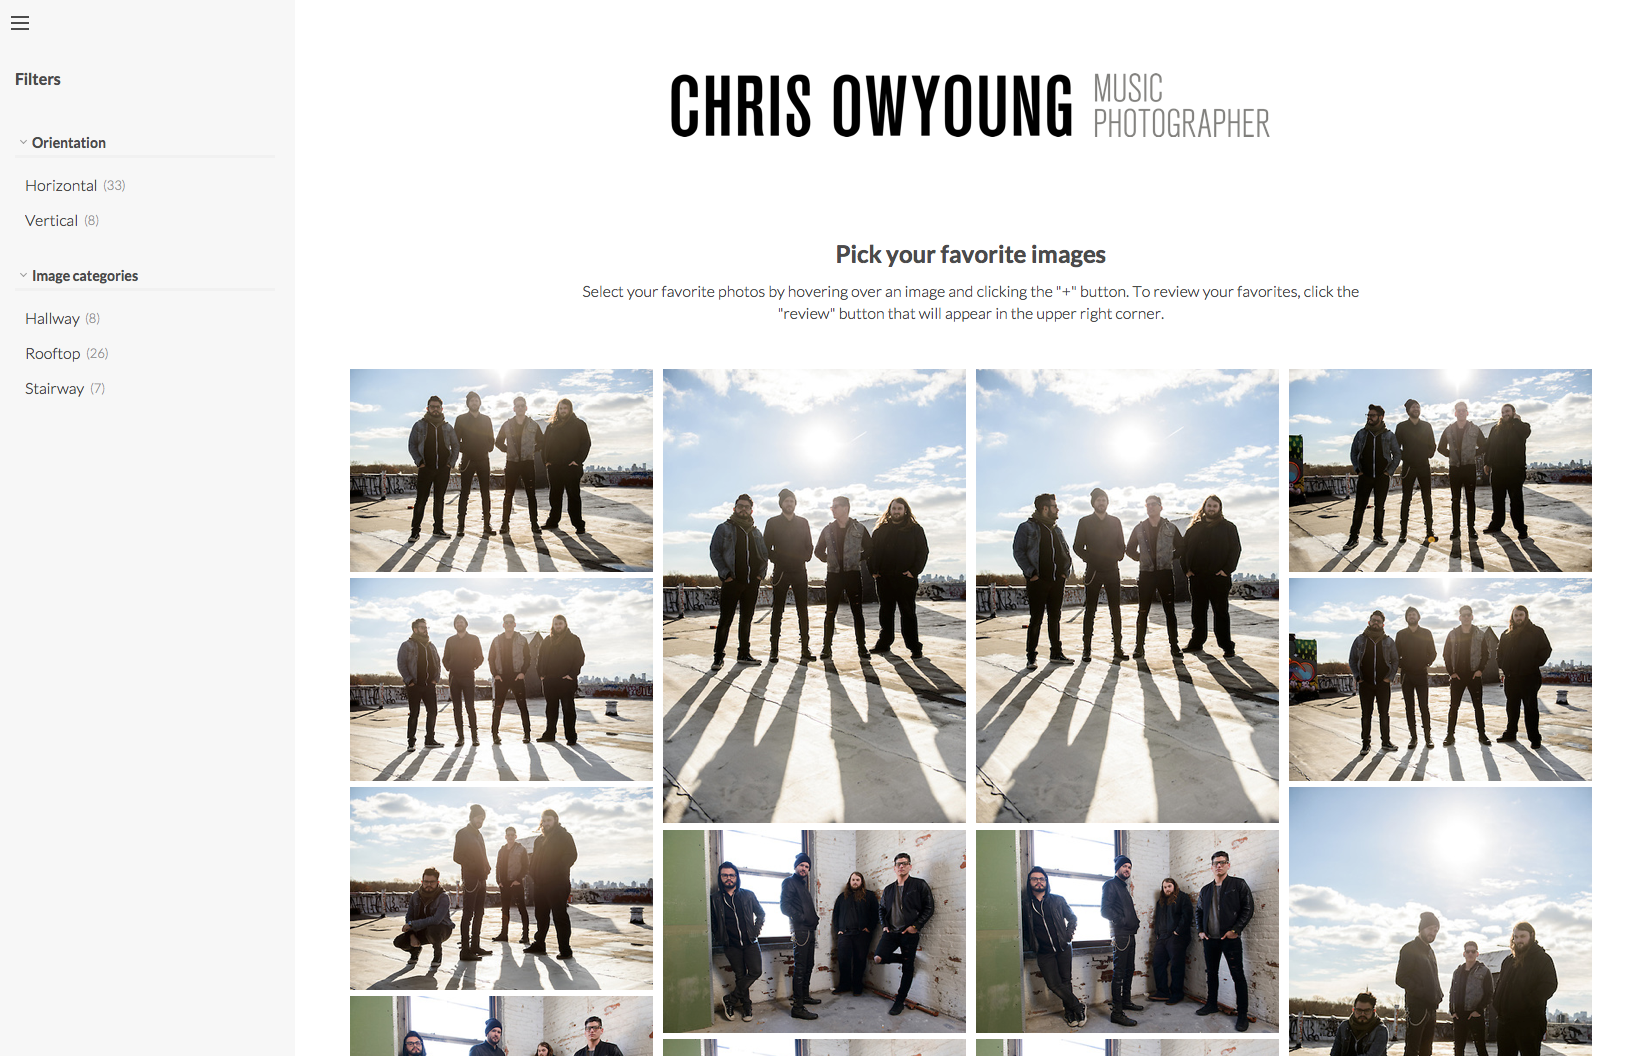
Upon clicking the View Photos button (or the direct URL from within the email body), your client will immediately be taken into a new mobile-friendly gallery view, designed specifically for the client proofing process.
![]() Note: In this example, a password was selected for the client (as described above). That password is displayed for the client right below the View Photos button, and will be required for access. If this were a gallery with a visibility of Everyone, no password would be necessary.
Note: In this example, a password was selected for the client (as described above). That password is displayed for the client right below the View Photos button, and will be required for access. If this were a gallery with a visibility of Everyone, no password would be necessary.
While of course still branded with your website's logo to maintain a seamless experience, this display is kept totally separate from the rest of your site so clients cannot accidentally browse away from the task at hand. If you've invited them to proof a gallery, they will only see that gallery, and not everything you have featured on your site, which will help to keep the focus on the image selection process alone.
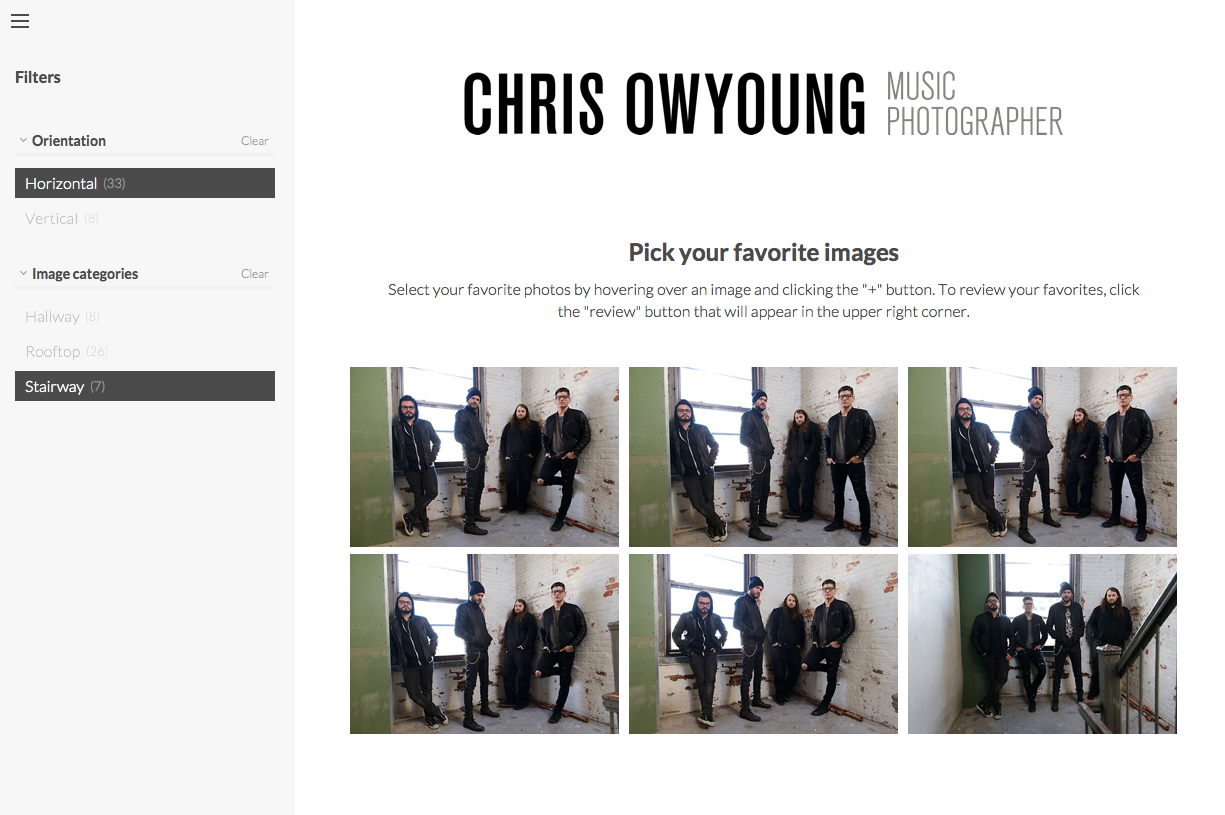
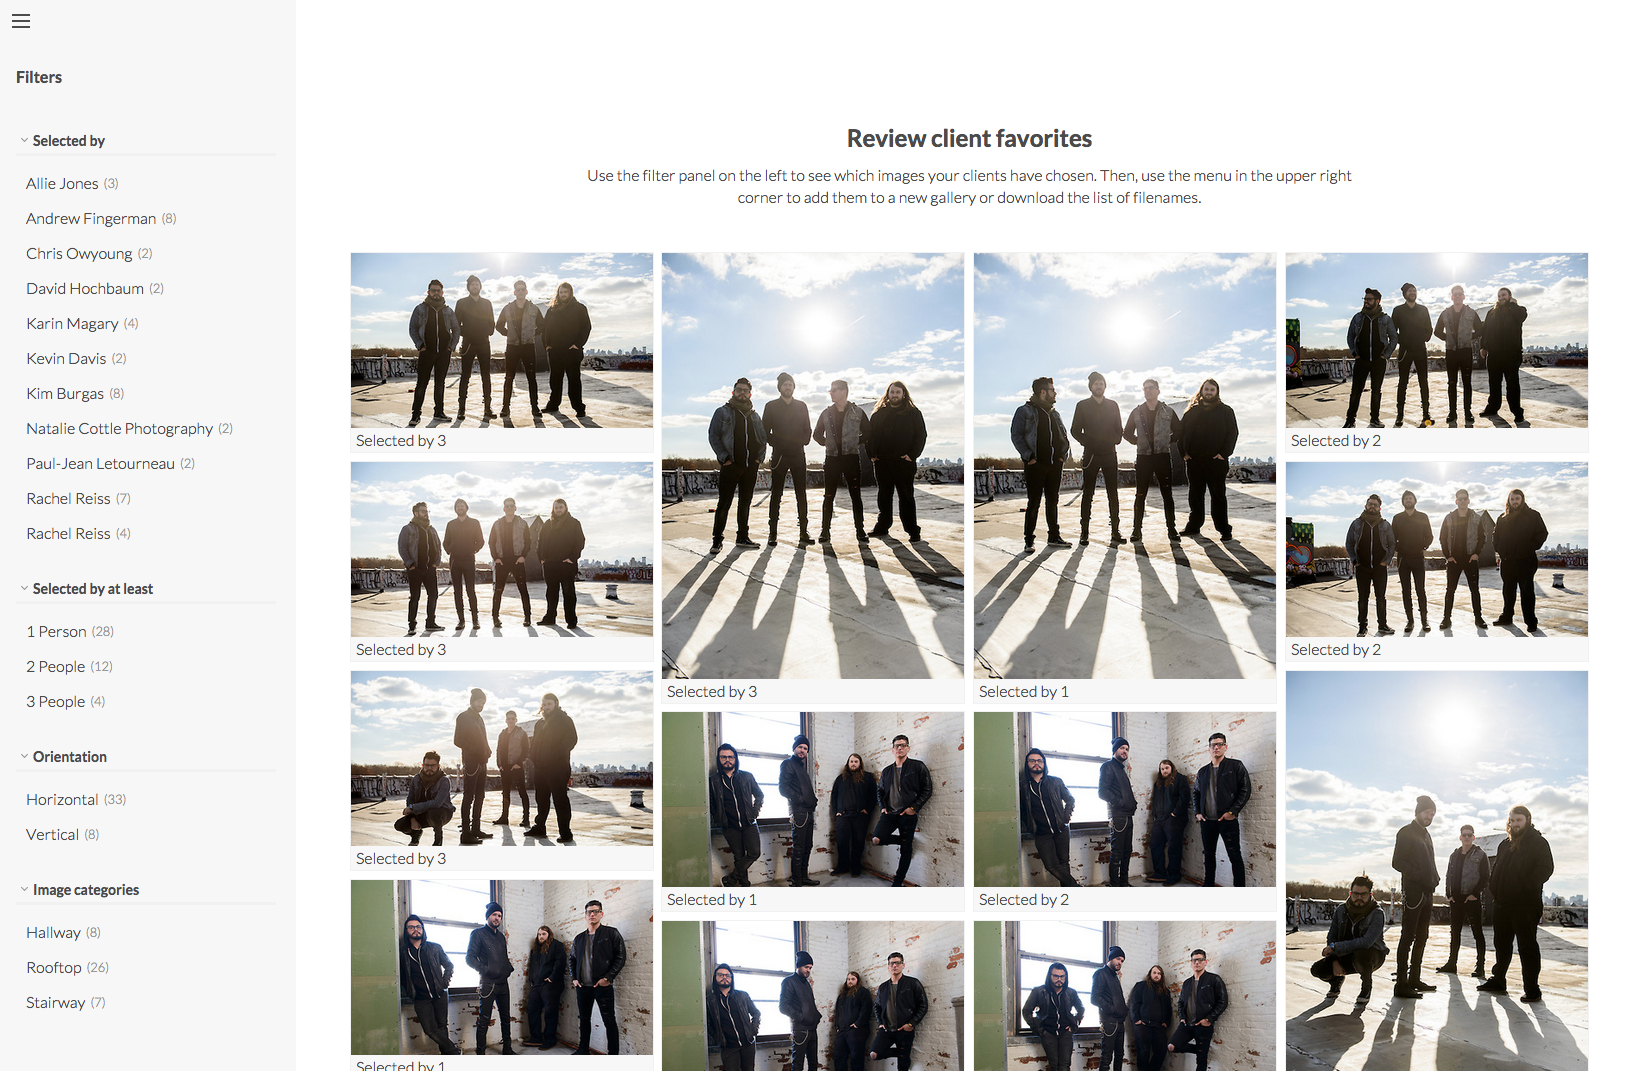
Now, it's all about filtering, viewing and selecting. Here's how things will work for the client:
Viewing custom sets
In order for a client to view a custom set that you have created, they must log in to a free account. If the access given was already tied to their email address, they will automatically be logged in and see the custom sets. If access was not tied to their email address, they can click the "login" link on the top right corner of the client proofing page. Here, they will be prompted to login, or create a free account.
![]() Note: Custom sets can only be created by the photographer. At this time it is not possible for clients to create custom sets of their own.
Note: Custom sets can only be created by the photographer. At this time it is not possible for clients to create custom sets of their own.
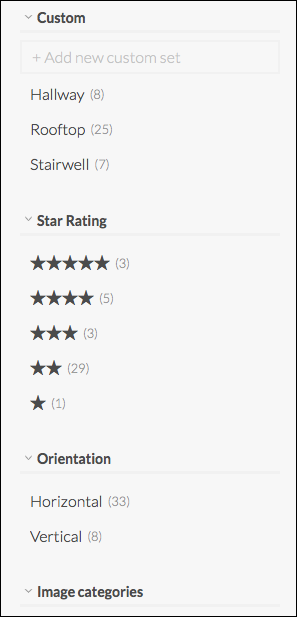
Filter images by orientation, keyword, star rating, and custom sets
From the panel on the left, the client may filter the images in the gallery by:
- Orientation - horizontal or vertical
- Category - pulled from the keywords that you have entered in the metadata for your images. Keywords that exist on every image in the gallery will be excluded from the filters to ensure this filter is useful for all viewers.
- Star Rating - pulled from the ratings you have made in the metadata either in the editing program you use, or edits/additions you make in the Actions dropdown in your Image Browser.
- Custom Set - as created by the photographer
- Any combination of the above that have common images.
Using multiple filters at once (for instance, filtering by orientation and then by keyword) can really help to refine things. As the photographer, you’re able to choose specific keywords for filtering, or you can just rely on custom sets for your clients to really take advantage of this feature. Any keywords that exist on all images in the gallery will be excluded so the filtering will be more precise.
Viewing options
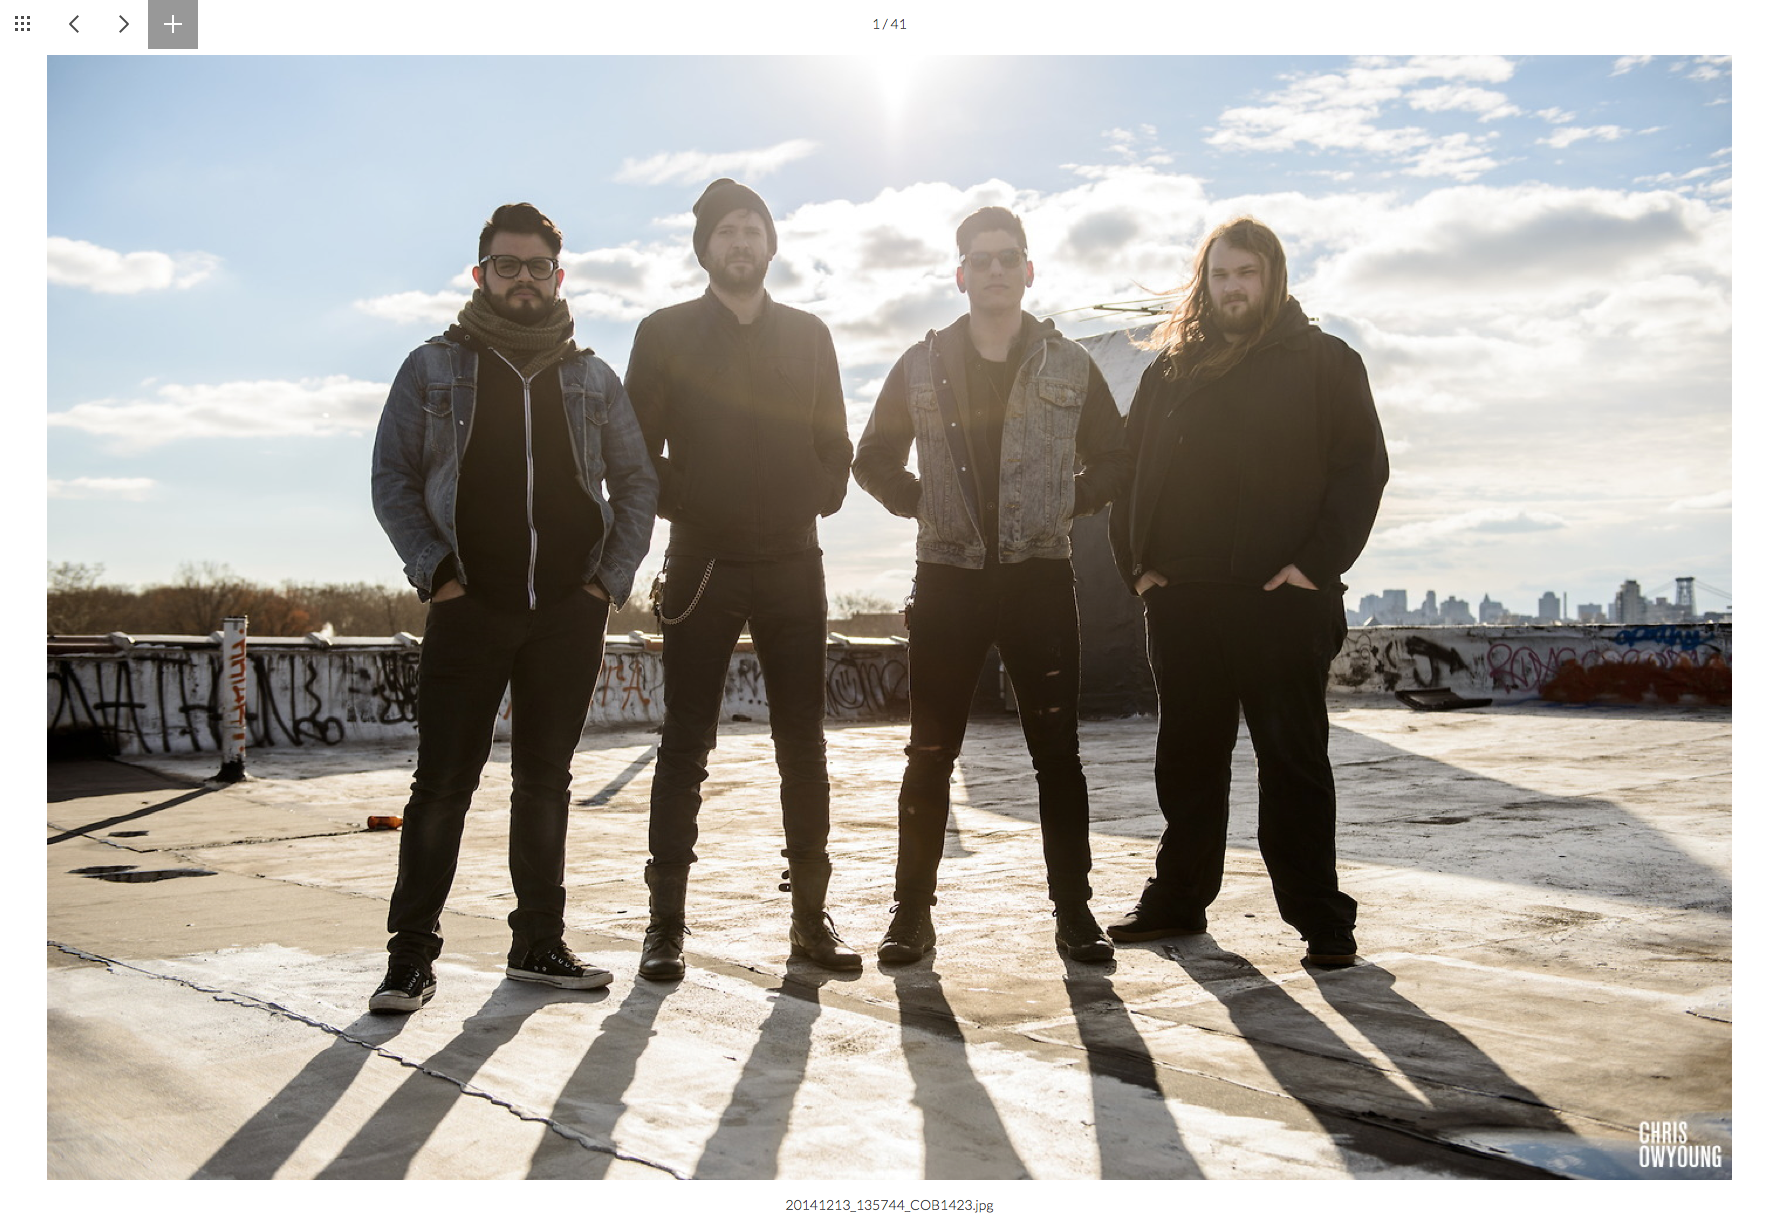
Your client may use the thumbnail view to get a better sense of the entire shoot, or switch to the larger view to see each image in detail.
One-click favorites
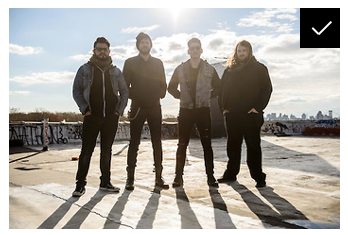
To select (or "favorite") an image, all the client needs to do is hover over a thumbnail, and a + sign will appear in the upper right corner.
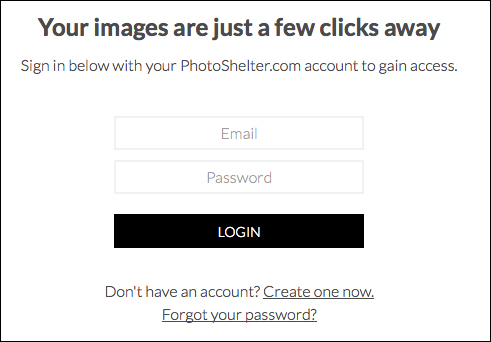
When that + sign is clicked, the client will be asked to login to save their selections ONLY IF access was not already tied to their email address, in which case they would have been asked to login at the beginning of the process. Favorites may only be saved and shared with you if the client logs into an account. This way, we can tie those selections to their name/email address.
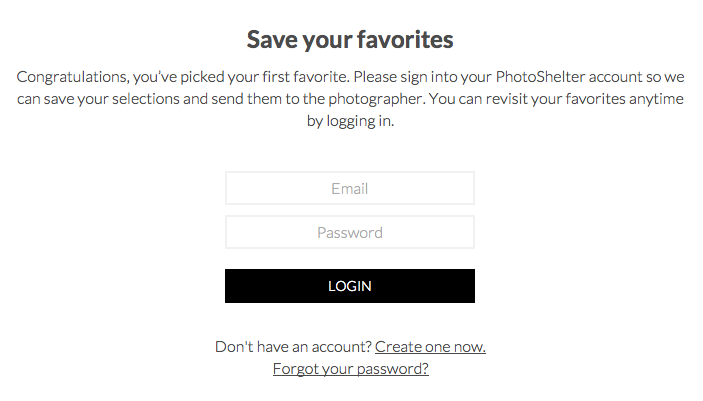
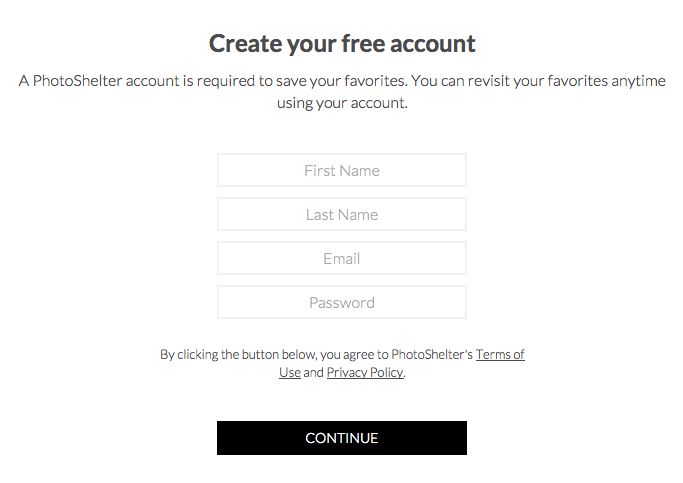
If your client does not already have a PhotoShelter account of some sort, they may click the Create one now link to sign up for one. It's totally free, and all we require is a name, email address and password.
Immediately after login/signup, your client will be taken right back to the image they'd tried to select, and that + sign will now be a check mark, indicating a successful selection.
Alternatively, if the larger, single image view is engaged, keyboard shortcuts may be used to even further simplify the browsing and selection process. The left and right arrows to go back and forth between images, and the up arrow to favorite.
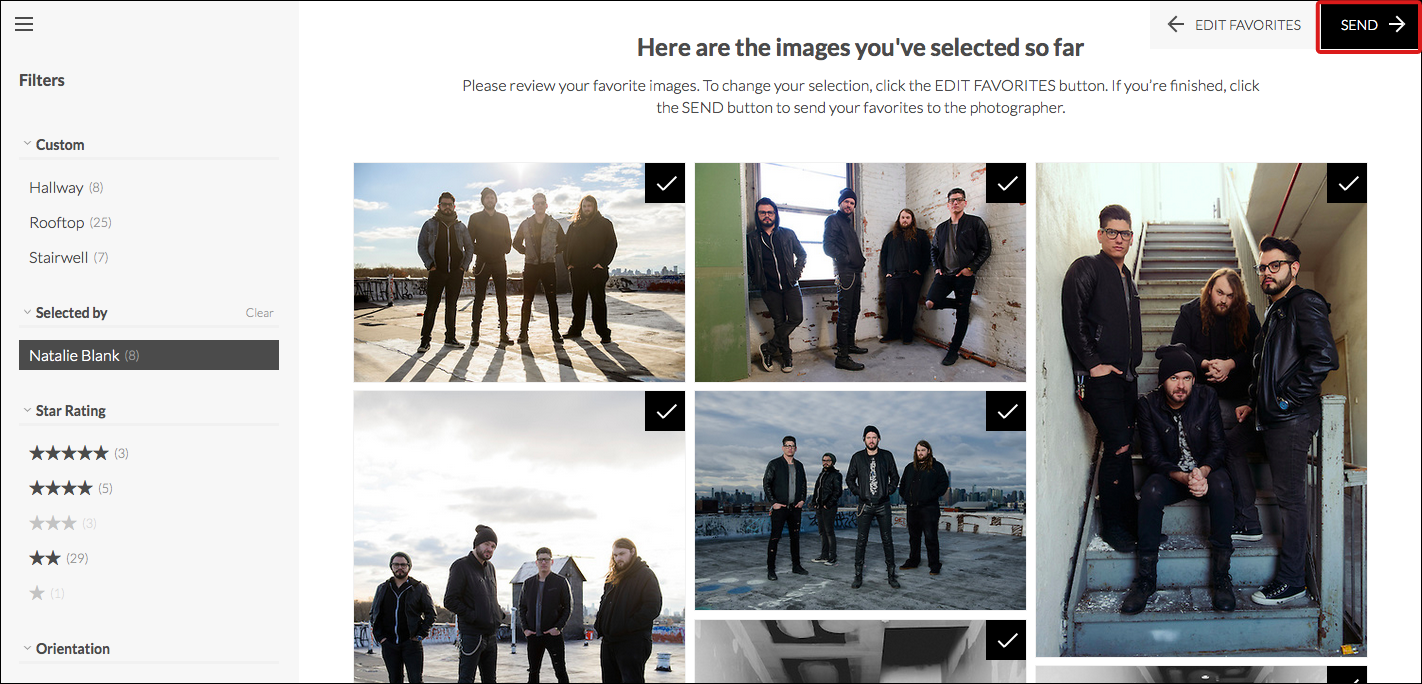
Your client may now select as many images as they like. At any point, the Review Favorites button located at the top right corner of the page may be clicked to see what’s been selected so far.

When finished and ready to share their selections, all your client needs to do is click Send, and you will be immediately notified via email.
Next Steps
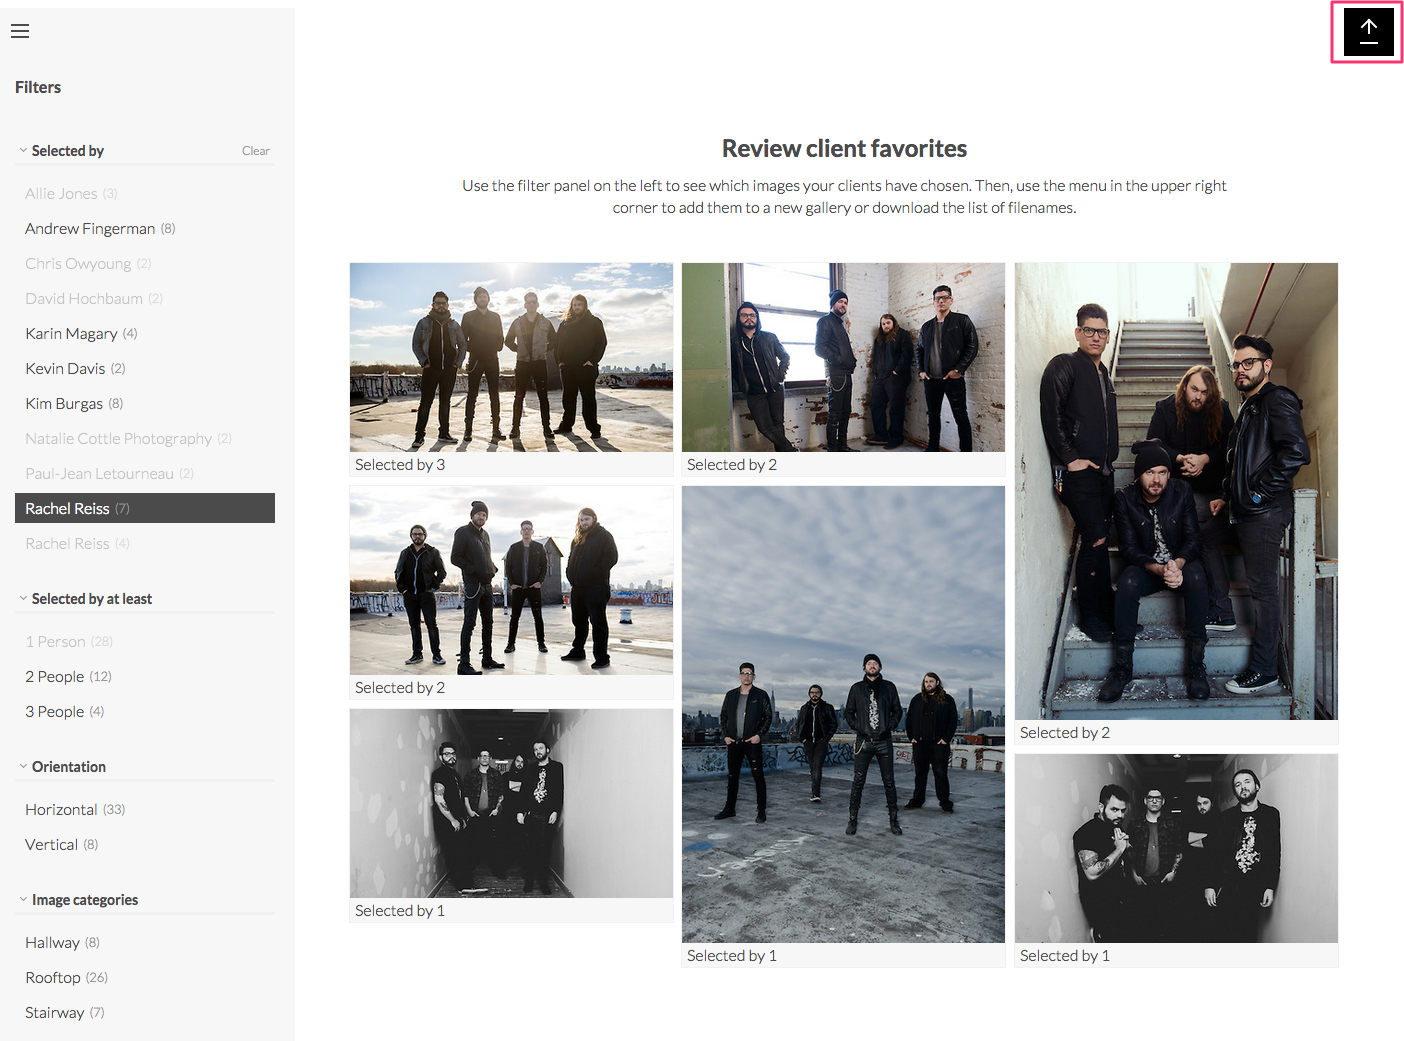
1. Once your client has shared their favorites with you, you may review them by either clicking the link in the notification email, or head back to your Image Browser, expand the Client Proofing section for your gallery, and click the View Favorites button.
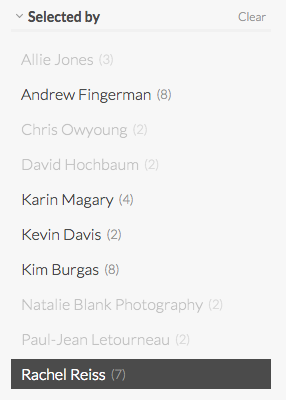
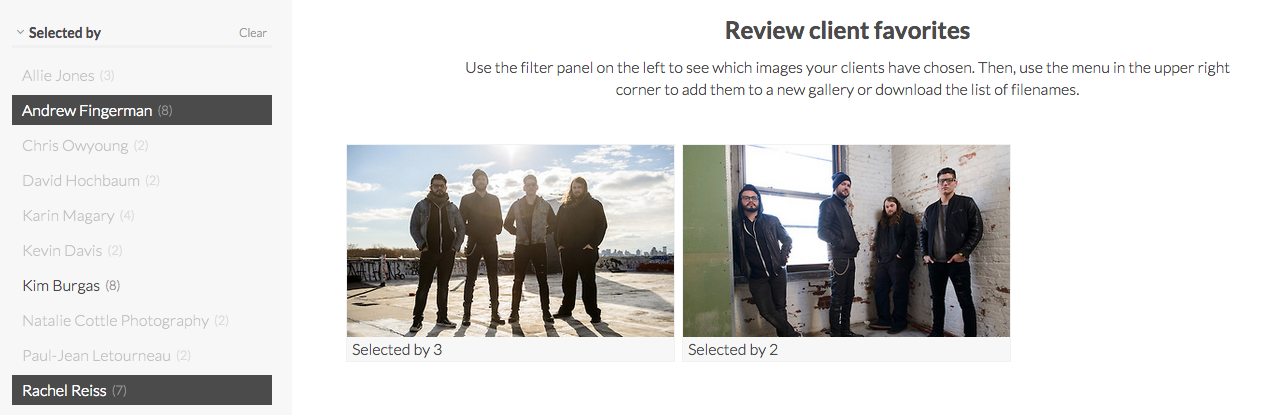
2. Now, in the panel on the left, you will see a list of each client who has reviewed and made selections for this gallery. Clicking on a name will show you just that client’s selection.
3. To compare client selections and see which images your clients have favorited in common, start by clicking on one client's name. You will see that you can then click on the names of any others who have chosen one or more of the same images.
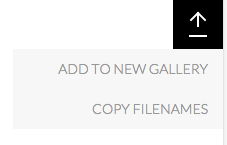
4. To take your next steps, click the Actions icon at the top of the page.
Here you will find options to:
- Add the particular selection you are viewing to a new gallery
- Copy the filenames for your selection to the clipboard
If you add the images into a new gallery, you will then be able to quickly provide download access (via gallery download, Quick Send, or FTP), or present the images to your client for purchase. (If you're not already set up to sell with PhotoShelter, you may learn more in this article.)
If you choose to grab the file names, you can easily connect your client’s favorites to your original images in Adobe Lightroom so you can make any requested edits, and then automatically publish the final versions right back to PhotoShelter. All you have to do is copy the file names, paste them into Lightroom, and you will be presented with your client's exact selections for editing purposes. Learn more about PhotoShelter's officially-supported publish service for Lightroom in this article.