The PhotoShelter Print Vendor Network is an open directory of print labs that can receive orders from PhotoShelter photographers for printing and/or shipping. Through the Print Vendor Network, you may opt to forward any self-fulfilled order to be printed by the lab of your choice and shipped either to you or directly to your client. This way you have the flexibility of traditional self-fulfillment but without having to re-upload your images and manually send along order details to your trusted lab.
The difference between our four Integrated Partner Labs and the Print Vendor Network is that the automated print fulfillment arrangement we have with EZ Prints, Printique, Loxley Colour, and White House Custom Colour was developed by PhotoShelter and the lab directly, and all of their products shipping options and rates are preloaded into the PhotoShelter pricing profile for your convenience. Plus, PhotoShelter facilitates the exchange of funds between photographer and buyer. The Print Vendor Network, rather, builds upon the self-fulfilled platform to allow you to link any product you create with a willing vendor - it just takes a bit more start-up configuration on your part, as well as a bit more manual work on the vendor's part to retrieve the images from the PhotoShelter system.
Furthermore, you may be able to find a new vendor that suits your needs by searching our Print Vendor Network Directory. The beauty of the Print Vendor Network is that you may link up with any vendor that matches your needs. Want to sell Hahnemuhle prints out of a lab near your home in Texas, for example? Search for a lab that fits this bill, send your order out to them, and get back to shooting!
![]() Note: You are responsible for arranging your own billing with the print vendor. Generally, the lab likes to keep a credit card number on file or send periodic invoices depending on the individual lab and photographer.
Note: You are responsible for arranging your own billing with the print vendor. Generally, the lab likes to keep a credit card number on file or send periodic invoices depending on the individual lab and photographer.
Setting Up to Use the Print Vendor Network
1. Discover a new lab, or ensure that your preferred lab is part of the network. Search the directory by keyword, name, or location to find the lab that suits your needs. We highly suggest adding labs to your favorites for easier access later. You can do this by simply clicking the view profile link from the Print Vendor Network Directory and then clicking the Add to Favorites button.
Your preferred lab not showing up? Invite them to the Print Vendor Network to get them linked in!
![]() Note: When working with a Print Vendor Network lab, you will be billed directly by the lab for printing and shipping costs outside of the PhotoShelter system. Some labs may want to have a credit card on file before they will print your first order, so it's good to do this research in advance. PhotoShelter does not automate payment to Print Vendor Network partners. You must handle this offline with the individual lab - so get in touch before moving forward.
Note: When working with a Print Vendor Network lab, you will be billed directly by the lab for printing and shipping costs outside of the PhotoShelter system. Some labs may want to have a credit card on file before they will print your first order, so it's good to do this research in advance. PhotoShelter does not automate payment to Print Vendor Network partners. You must handle this offline with the individual lab - so get in touch before moving forward.
![]()
2. Your next step is to set up the items you want to make available for sale. Unlike our 4 Integrated Print Vendors, the Print Vendor Network operates using the self-fulfilled mechanism, which means you must manually define the prints and products you want to offer. To learn more about self-fulfillment in PhotoShelter, head over to our tutorial on Self-Fulfillment Products. If you're working with a new lab, you should download the product and pricing details from their profile page, which you may find from the directory. If the vendor hasn't made these details available for download, you may want to reach out to the lab to get their full inventory and pricelist, including their shipping fees.
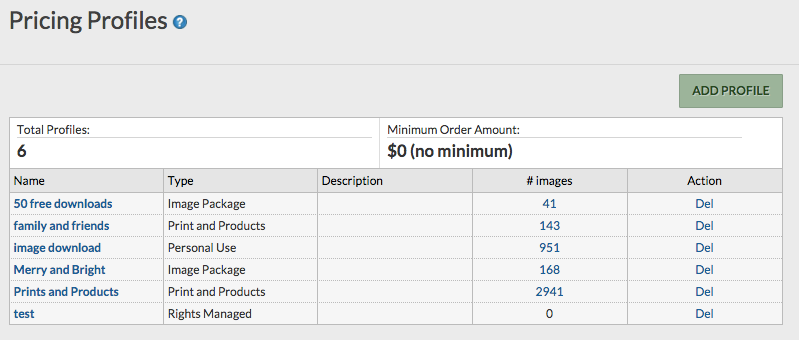
3. Once you've created your self-fulfillment products (if you haven't done this yet, check out the Self-Fulfillment Products tutorial), you need to create a Pricing Profile. Select Sell > Pricing Profiles from the Navigation Bar and either click the blue Add Profile button to create a new Pricing Profile or click one of your existing Prints and Products profiles.
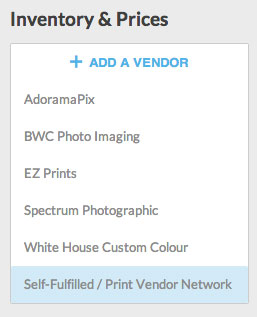
4. In the Inventory & Prices section, click the + Add a Vendor button and select Self-Fulfilled / Print Vendor Network.
![]() Note: If you have not yet created any self-fulfillment prints/products, you will not see the Self-Fulfilled / Print Vendor Network option in the drop-down list.
Note: If you have not yet created any self-fulfillment prints/products, you will not see the Self-Fulfilled / Print Vendor Network option in the drop-down list.
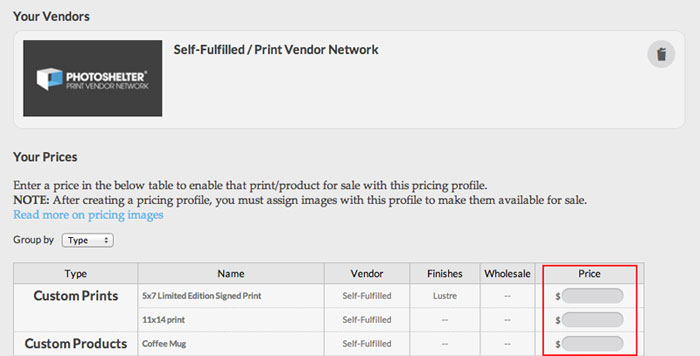
5. All of the self-fulfillment items you've created will appear, ready to be added to your Pricing Profile. In the blank Price fields provided next to each print/product name, enter the price at which you'd like to offer that particular print/product (leave the field blank if you do not want to offer a particular option here). Be sure to click the Save Pricing Profile button at the bottom of the page when you’re finished setting your prices.
Use the Group by drop-down to sort self-fulfillment prints/products as desired (by type, size, or no sort).
Selling Via the Print Vendor Network
You've set up to use the Print Vendor Network -- what's next? And what happens after a purchase is made? Find out below.
1. After you have created or updated a Pricing Profile, you need to apply it to your galleries or images that you want to make available for this particular self-fulfilled item. Read more here about Applying Pricing Profiles.
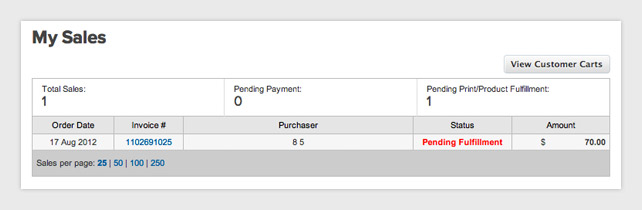
2. Once you've made a sale (congratulations!) you will receive an email notifying you of the sale, and you may then send it off to the vendor of your choice. To send the order to the lab, select Sell > My Sales from the Navigation Bar and then click on the invoice number of the print or product that's pending fulfillment.
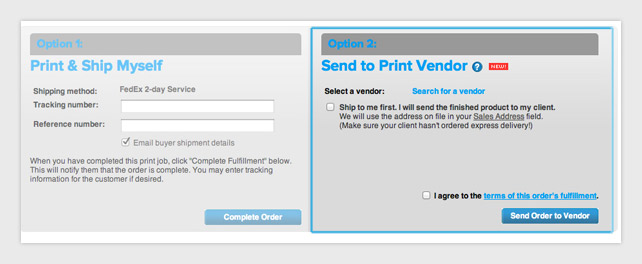
3. On this page you'll see two options: Print & Ship Myself or Send to Print Vendor. Choose Option 2: Send to Print Vendor, and then you may search for the vendor of your choice, pick a new vendor, or (if you've been here before) choose from any vendors you've marked as favorites. Alternatively, you also have the option to have the order shipped to yourself, which is popular with photographers who want to add custom inserts or packaging before the orders go out to their buyers. This at least saves you the hassle of having to re-upload images to another vendor, as we take care of delivering the images, and order details are sent directly to the selected vendor.
![]() Note: Read more about Self-Fulfillment Products.
Note: Read more about Self-Fulfillment Products.
At this point, you may also choose to override the buyer's crop, as well as replace the image in the PhotoShelter system with a high-resolution image, before we send the images out for fulfillment. This allows you to upload low-res files for storage space reasons and replace them only as needed.
3. Once you've confirmed the images that will be sent and you agree to the Terms of Use, click the blue Send Order to Vendor button and your vendor will be notified of the pending order. The vendor is required to log in to securely download the high-resolution images that need to be printed. At this point you'll see your order status change from Pending Fulfillment to Sent to Vendor.
Also, once your vendor has completed the order, they will click a Complete button on their side and you'll be notified by email. At this point your order's status will change to either Complete or Shipped by Vendor depending on whether you've elected to have the order shipped to you or your buyer. In the case of the order going directly to the buyer - when the vendor completes the order, your buyer will also be automatically notified by email. The email will contain your branding and will not make reference to the lab that performed the fulfillment.
![]() Note: In the case that a vendor cannot or does not want to fulfill an order that is sent to them, which they may opt to do for any reason, they can opt to reject the order (though they must provide a written reason why). You will be notified by email at this point, and you can then choose to re-send that order to another vendor (or re-send to that vendor after fixing something at their request, if so indicated) or handle it yourself offline.
Note: In the case that a vendor cannot or does not want to fulfill an order that is sent to them, which they may opt to do for any reason, they can opt to reject the order (though they must provide a written reason why). You will be notified by email at this point, and you can then choose to re-send that order to another vendor (or re-send to that vendor after fixing something at their request, if so indicated) or handle it yourself offline.